How to Wire Solar Panels A Pro DIY Guide
Learn how to wire solar panels safely with our expert DIY guide. We cover series vs. parallel wiring, connecting components, and troubleshooting.
How to Wire Solar Panels A Pro DIY Guide
Before you touch a single wire, let's talk about what really makes a solar installation successful. It's not about how fast you can get the panels on the roof; it's about the meticulous prep work you do beforehand. I can't stress this enough: this pre-wiring check is non-negotiable. Skipping this part is the fastest way to fail an inspection, fry expensive equipment, or worse, get seriously hurt. Your goal here is to set up a workspace that's safe, efficient, and up to code before making a single connection.
Your Essential Pre-Wiring Safety Check
A safe and successful solar project starts long before you start connecting panels. This isn't just about grabbing your tools; it's about building a safety-first mindset that will carry you through the entire installation. I've seen it time and again—rushing this stage is a classic mistake that almost always leads to costly rework or a dangerous setup.
From personal experience, I've seen DIY projects go completely sideways because someone used the wrong gauge wire or didn't understand a local code requirement, forcing them to tear everything out and start over. Proper planning is what saves you from those massive headaches and ensures your system is solid for years to come.
Assembling Your Essential Toolkit
Having the right gear makes all the difference, turning a frustrating job into a smooth and, more importantly, safe one. Your standard toolbox is a good start, but wiring solar panels demands a few specialized items. Think of these as your partners in getting the job done right.
- High-Quality Wire Strippers and Crimpers: Please don't try to get by with a cheap multitool here. A dedicated MC4 crimper is critical for creating watertight, secure connections that prevent power loss and dangerous electrical arcs. You need clean strips every time, without nicking the copper.
- Digital Multimeter: This is your best friend for safety. It's the only way to be 100% sure about voltage and polarity before you connect anything. A multimeter will confirm your panel strings are putting out the voltage you expect, preventing you from accidentally destroying a very expensive charge controller.
- Insulated Tools: Get yourself a good set of screwdrivers and wrenches with insulated handles. It's a must. Even if you're certain a circuit is off, these tools provide that crucial layer of protection against an unexpected shock.
- Personal Protective Equipment (PPE): This means insulated gloves, safety glasses, and sturdy footwear. The moment sunlight hits a solar panel, it starts generating dangerous DC voltage. You have to treat every single wire as if it's live.
Understanding Codes and Site Conditions
Every project is different. Your local rules and the unique challenges of your property will dictate how you proceed. Ignoring these factors is a surefire way to fail. A buddy of mine once had to completely relocate an array because he didn't account for how big a new tree would get in a few years—a costly error a simple site assessment would have easily prevented.
A successful solar installation is 90% preparation and 10% execution. Time spent double-checking plans, understanding local electrical codes, and assessing your site is the best investment you can make in your project's safety and longevity.
Before you go any further, make a quick checklist to cover your site and local rules.
Site Assessment Checklist
- Sunlight and Shading Analysis: Walk the property and track the sun's path. Are there chimneys, trees, or other buildings that will cast shadows on your panels during prime sun hours? Remember, even a small amount of shade on one panel can drastically reduce the output of the entire string.
- Roof Integrity: If you're doing a roof mount, is the roof itself in good shape? Metal roofs are fantastic for solar since their lifespan of 40-70 years often outlasts the panels. An old asphalt shingle roof, on the other hand, should probably be replaced before you install a 25-year solar array on top of it.
- Local Electrical Codes: Your town or county's authority having jurisdiction (AHJ) has the final say. Look up their specific requirements for things like conduit, wire types, grounding methods, and where disconnect switches must be located. Often, a quick phone call to the local building department can save you from a major headache later.
By taking the time to work through this pre-wiring check, you're building a solid foundation. This isn't just about bureaucracy; it's about making sure the system you build is safe, powerful, and compliant from the very start.
Choosing Series Or Parallel Wiring
Deciding between series and parallel wiring is one of the most critical calls you'll make when setting up your solar array. This choice directly impacts your system's performance, influencing everything from the thickness of your cables to the specs of your charge controller. It sounds technical, but the core ideas are actually quite simple.
Think about batteries. When you connect them end-to-end (positive to negative), their voltages combine. That's a series connection. When you line them up side-by-side (positive to positive, negative to negative), their amperage adds up. That's a parallel connection. Solar panels follow the exact same logic.
The Power Of Series Connections
Wiring your panels in series is like building a longer, more powerful train. You simply connect the positive terminal of one panel to the negative terminal of the next, creating a chain.
The result? The total voltage of your string goes up, while the current (amperage) stays the same.
Let's say you have four 100-watt panels, each rated for 20 volts (V) and 5 amps (A). Stringing them together in series gets you:
- Voltage: 20V + 20V + 20V + 20V = 80 Volts
- Current: 5 Amps (it doesn't change)
This high-voltage configuration is incredibly efficient. Higher voltage travels better over long distances, which means you can use thinner, cheaper wire to connect your array to your charge controller without losing much power along the way. It's a huge plus for ground-mounted arrays located a good distance from your house.
When Parallel Connections Make Sense
Now for the other approach. A parallel connection means linking all the positive terminals together and all the negative terminals together, often using branch connectors or a combiner box. This is less like making the road longer and more like adding extra lanes to a highway.
With parallel wiring, the voltage stays the same as a single panel, but the current from each panel adds up.
Using those same four 100-watt panels (20V, 5A each), a parallel setup gives you:
- Voltage: 20 Volts (no change)
- Current: 5A + 5A + 5A + 5A = 20 Amps
The big win here is shade tolerance. If a tree branch or a chimney shades one panel in a parallel string, only that panel's output drops. The others keep chugging along at full power. In a series string, that same little bit of shade would tank the performance of the entire string. This makes parallel the go-to choice for roofs with known, unavoidable shading issues.
The bottom line is this: your wiring strategy has to play nice with your charge controller. A high-voltage MPPT controller loves series strings, but a lower-voltage PWM system might need a parallel setup to stay within its operational limits.
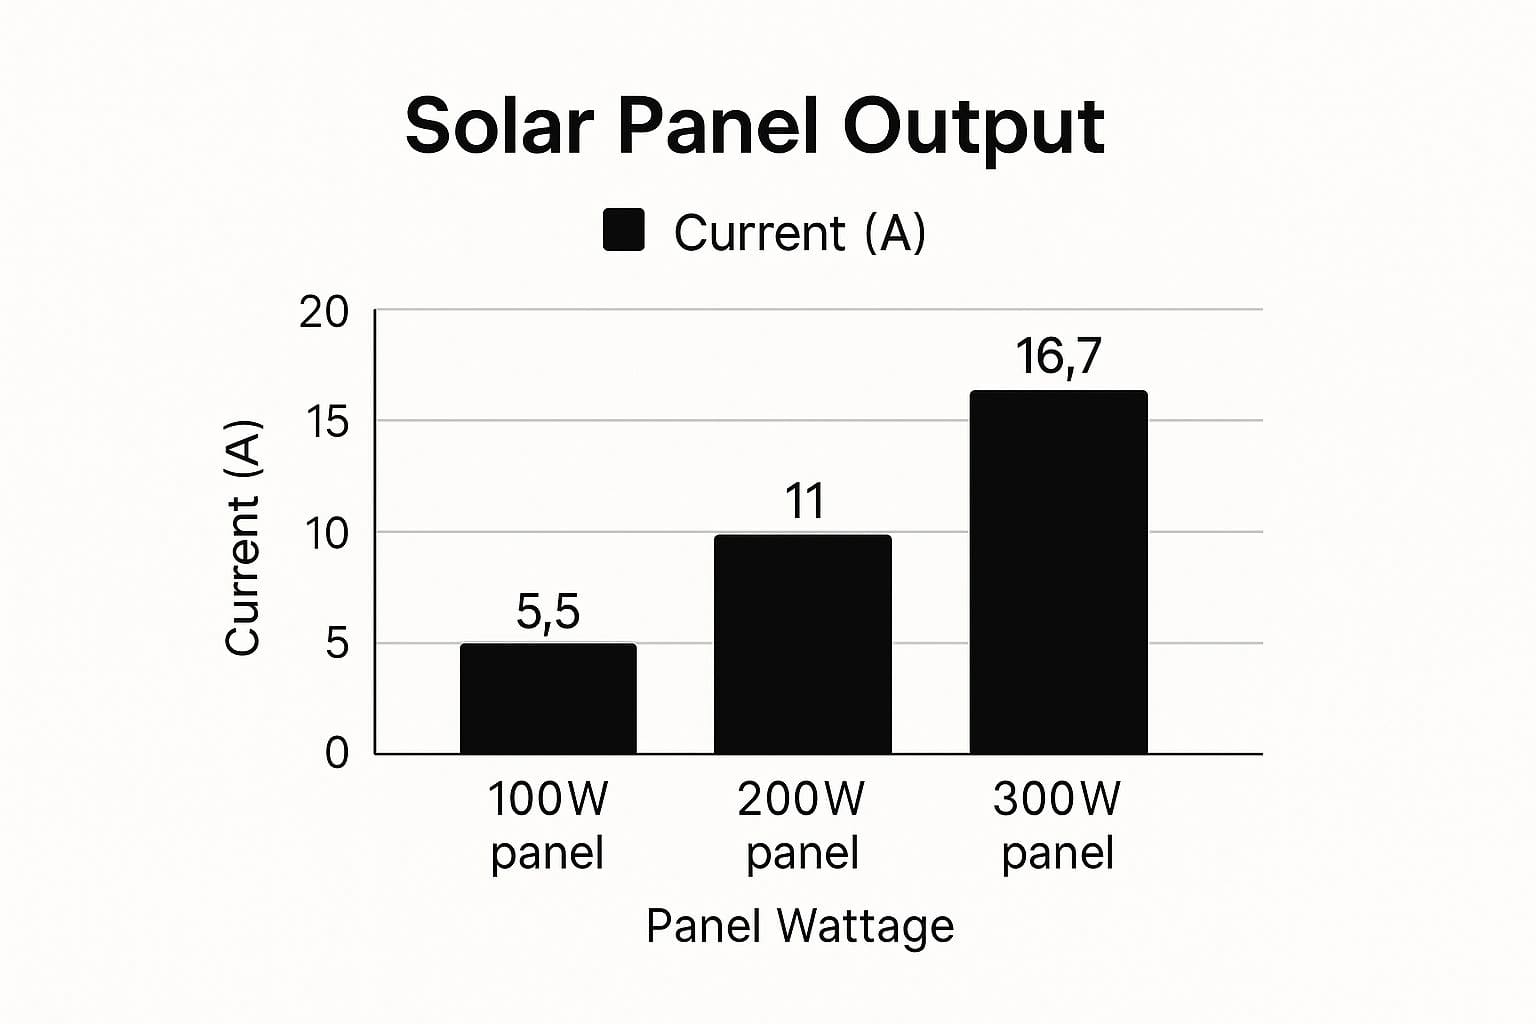
The image below shows how a panel's wattage relates to its current—the key factor in parallel wiring.
Solar panel current output increases with wattage - higher wattage panels require thicker cables for parallel wiring
As you can see, higher-wattage panels push out more amps, demanding thicker and more expensive cables when you wire them in parallel.
Before we dive into hybrid setups, this quick table should help clarify the core differences using a common panel size.
Series vs Parallel Wiring At a Glance
| Attribute | Series Wiring (4 Panels) | Parallel Wiring (4 Panels) |
|---|---|---|
| Connection | Positive to Negative Chain | Positive to Positive, Negative to Negative |
| Voltage | 12V x 4 = 48V | 12V (Unchanged) |
| Current | 8A (Unchanged) | 8A x 4 = 32A |
| Best For | Long wire runs, no shading | Partial shading issues |
| Shade Impact | High (one panel affects all) | Low (only the shaded panel is affected) |
This simple comparison shows just how dramatically your choice affects the system's electrical characteristics. Always double-check your numbers to ensure they match your equipment's specifications.
Combining Both With Hybrid Wiring
The good news is you don't have to pick just one. Larger solar installations almost always use a hybrid approach called a series-parallel connection. In this setup, you create several identical series strings and then connect those strings together in parallel.
This method really gives you the best of both worlds. You get a high enough voltage for good efficiency while also boosting the total current to meet your inverter's demands. For example, you could wire two strings of four panels in series (each string being 80V at 5A), then connect those two strings in parallel. Your final output would be 80V and 10A—a powerful and efficient configuration perfectly matched to the system's hardware.
Of course, figuring out how many panels you need in the first place is the real starting point. Before you worry too much about wiring, you need a solid plan for your array size based on your home's energy consumption. You might find our guide on how many solar panels you need to power a house helpful for that initial planning stage.
A Practical Guide to Connecting Your Panels
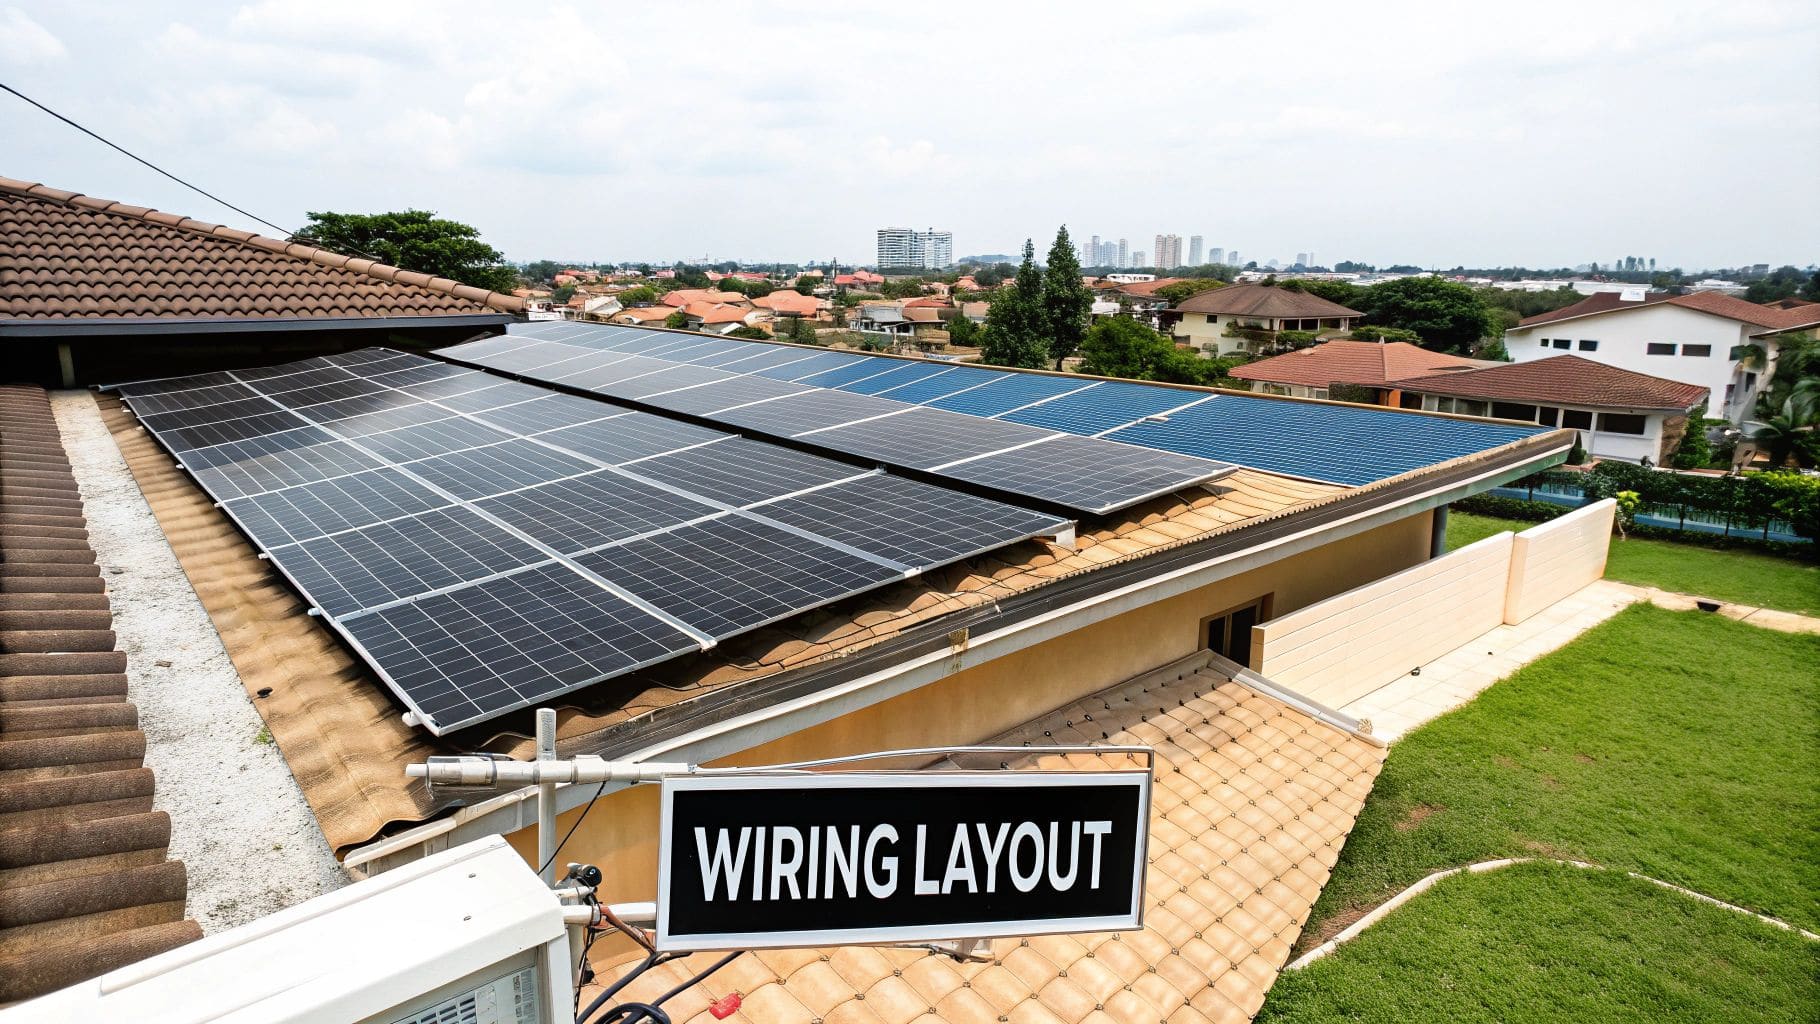
Proper wiring layout is crucial for rooftop solar installations - plan your cable routing before mounting panels
Alright, you've picked your wiring strategy. Now it's time to get hands-on. This is where the planning stops and the real work begins—making the physical connections that will power your system for years to come.
Making these connections secure and weatherproof isn't just a suggestion; it's critical. I've seen too many systems fail because of a sloppy connection made on day one. A little bit of carelessness here can lead to power loss, moisture getting in, and even dangerous electrical arcs down the road. We'll start with the most common connector you'll encounter, the MC4, and then talk about how to manage all that wiring like a pro.
Mastering the MC4 Connector
Just about every modern solar panel uses MC4 connectors. There's a good reason they're the industry standard: they're tough, they lock together securely, and they're built to survive decades of sun, rain, and snow. Learning to attach these to your extension cables is a must-have skill.
First things first, you need to strip the end of your PV wire. Grab a good pair of wire strippers and carefully remove about half an inch (12-15mm) of the insulation. Be very careful not to nick the copper strands underneath. Any damage to the wire creates resistance and heat—two things you absolutely want to avoid.
Next up is crimping the metal contact pin onto the bare copper. Let me be clear: you need a dedicated MC4 crimping tool for this. Don't even think about using pliers. They just won't work and you'll end up with a weak connection that's practically guaranteed to fail.
- Pro tip: Slide the plastic nut onto the wire before you crimp the pin. It's a classic mistake to forget this step and have to cut off a perfectly good crimp.
- Place the metal pin into the correctly sized slot on your crimper.
- Push the stripped wire into the pin, and then squeeze the crimper handles firmly until the tool automatically releases. You should be left with a clean, solid hexagonal crimp that feels like a single piece of metal.
With the pin crimped, you can push it into the plastic MC4 housing. Listen for a very distinct "click." That click is your confirmation that the pin is locked in. To finish it off, hand-tighten the plastic nut on the back to create a watertight seal. Give the wire a good, firm tug to make sure everything is solid.
Building Your First String
Now that you know how to make a solid connection, let's put it into practice. Before you start linking panels, cover them with a blanket or the cardboard box they came in. This is a non-negotiable safety step. It stops the panels from producing a dangerous amount of DC voltage while you're handling the wires.
If you're wiring in series, it's just a simple daisy chain. You'll connect the positive (+) MC4 connector from one panel directly to the negative (-) MC4 connector of the next one. Keep doing this down the line until you have a single positive lead at one end of the string and a single negative lead at the other. These two leftover wires are your "home runs" that will head down to your charge controller or combiner box.
For a parallel setup, you'll need MC4 branch connectors. These are essentially Y-shaped splitters that let you combine all the positive leads into a single wire and all the negative leads into another. It's really just plug-and-play, but make sure you hear that satisfying click every single time you connect one.
Take this from someone who's seen it happen: A weak or incomplete crimp on an MC4 connector is one of the most common failure points in a DIY solar installation. Take your time, use the right tool, and always double-check your connections by giving them a firm pull.
Smart Cable Management Strategies
Once your panels are all linked up, you'll have wires running everywhere. Just letting them hang loose or rest on the roof is asking for trouble. Over time, UV rays, moisture, and wind will wear down the insulation, which can lead to ground faults and kill your power production.
Good cable management isn't just about making things look tidy; it's about building a system that lasts.
- Use UV-Resistant Zip Ties: Secure the wires neatly to the panel frames or the mounting rails. Don't cheap out here—get high-quality, outdoor-rated zip ties that won't get brittle and snap after a year in the sun.
- Employ Wire Management Clips: These are purpose-built clips that snap onto the edge of the panel frames. They give you a perfect channel to run your wires through, keeping them up off the hot roof surface.
- Consider Conduit: For the long "home run" wires that go from your array down to your equipment, running them through a protective conduit is always the best practice. It offers total protection from physical damage and the elements.
Sizing Your Home Run Wires
Those long cables running from your array to your indoor gear are your home run wires. Picking the right thickness, or gauge, for these is crucial for minimizing something called voltage drop. Think of voltage drop as electrical friction; it's the energy your system loses as heat while pushing electricity down a wire. Using a wire that's too thin is like trying to drink a thick milkshake through a coffee stirrer—you lose a lot of the good stuff along the way.
Your goal should be to keep voltage drop under 3%. Any more than that, and you're just wasting solar power before it even gets to your batteries. The right wire gauge boils down to three things:
- Total Current (Amps): More amps need a thicker wire. This is why high-current parallel systems often require beefier—and more expensive—cables.
- Round-Trip Wire Length: The further the electricity has to travel from your panels to your charge controller, the thicker the wire needs to be to fight voltage drop.
- System Voltage: This is a big one. Higher voltage systems (like panels wired in series) can use a thinner, cheaper wire to move the same amount of power. It's a huge advantage.
The easiest way to get this right is to use an online voltage drop calculator. Just plug in your system's voltage, amperage, and the length of your wire run. The calculator will tell you the correct American Wire Gauge (AWG) to use, ensuring you get as much power as possible from your panels to your gear.
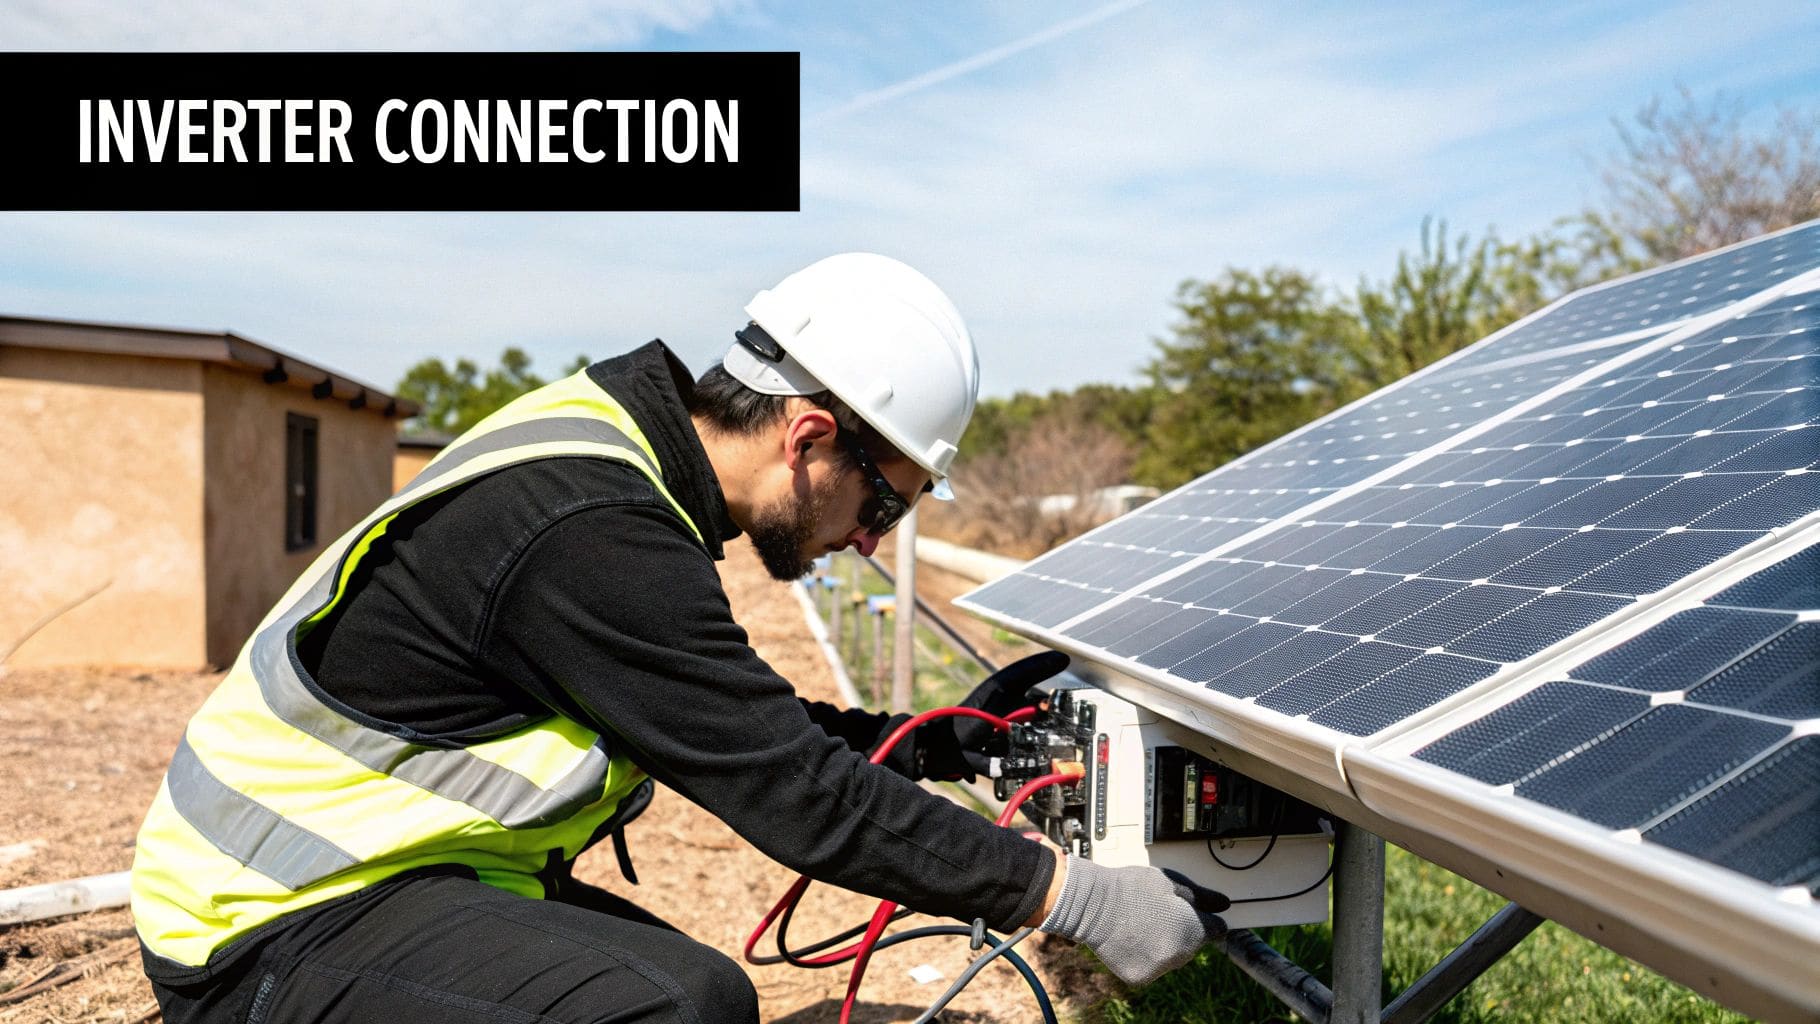
Integrating Your Array with System Components
Proper inverter connection is critical for system safety and performance - always follow manufacturer guidelines
Alright, your panels are all linked up and you've officially built a solar array. That's a huge step. But right now, it's just an island of potential power. The real magic happens when you channel that raw DC energy into the rest of your system—the charge controller, batteries, and inverter that make it all usable.
This is where the rubber really meets the road, and unfortunately, it's where a lot of DIY projects go sideways. One little mistake, like a reversed wire or a loose connection, can instantly turn thousands of dollars of sensitive electronics into very expensive paperweights. Let's get this right.
First Stop: The Combiner Box
Think of the combiner box as the central nervous system for your array's wiring. It's where the positive and negative "home run" cables from your panel strings all meet up before a single, heavier-gauge wire pair heads off to your charge controller. It keeps things tidy and, more importantly, safe.
Inside, you'll find a couple of key things:
- Bus Bars: A terminal for your positive leads and another for the negatives. This is where you'll land the wires coming from each string.
- Overcurrent Protection: You'll see fuses or DC-rated circuit breakers, one for each positive string. These are your system's bodyguards, protecting your gear from surges or short circuits.
Before you touch a single wire, make absolutely sure every breaker in the box is switched to the OFF position. Land each positive home run into its own dedicated breaker and each negative wire onto the negative bus bar. Don't just tighten the terminal screws—torque them down properly. A loose connection here can arc, and that's a serious fire hazard.
Connecting to the Charge Controller
The charge controller is the brains of the operation, managing the flow of power to your batteries and preventing them from overcharging. The connection sequence here is not just a suggestion; it's a critical, must-follow rule.
With home solar booming—the U.S. residential market alone installed 1,106 megawatts (MWdc) in just the first quarter of 2025—proper wiring has never been more crucial. A simple voltage mismatch from a bad connection can cut your system's output by 20% or more. Even worse, it can create a legitimate fire risk.
The Golden Rule of Solar Wiring: Always connect the battery to the charge controller first, before you even think about connecting the panels. The controller needs to see the battery voltage to know what it's working with. If you connect the panels first, you'll send unregulated high-voltage power straight into the controller and fry it on the spot.
With the combiner box wired up, run your main output cables to the PV input terminals on the charge controller. Pay obsessive attention to polarity: red to positive (+) and black to negative (-). Getting this backward is another surefire way to kill your equipment.
The Vital Role of Grounding
Grounding is the single most overlooked safety measure in DIY solar, and it's one of the most important. A proper ground protects you, your family, and your expensive equipment from electrical shocks, lightning strikes, and short circuits by giving stray electricity a safe path to the earth.
You'll need to handle two types of grounding:
- Equipment Grounding: This is about bonding all the metal parts together. You'll run a bare copper or green-insulated wire from the panel frames and mounting racks to a grounding bus bar. This ensures everything is at the same electrical potential.
- System Grounding: This typically means grounding the negative side of your DC circuit. A ground wire will run from your battery bank's negative terminal (or a specific ground lug on your controller/inverter) to a copper grounding rod driven several feet into the earth.
Local electrical codes have very specific rules for grounding, so check them. Don't guess. A properly grounded system is a safe system.
After connecting the batteries and then the PV input, you can wire the output of the charge controller to your battery bank. How you do this depends on your specific model, whether it's a basic PWM unit or a more sophisticated MPPT controller. If you're still deciding which to use, our guide on the differences between MPPT and PWM charge controllers can help. https://solarpowergenius.com/guides/mppt-vs-pwm/
Finally, once everything is connected in the correct order—battery to controller, then panels to controller—you can head back to the combiner box and flip on the breakers. Before you power up the whole system, use your multimeter one last time at the controller's PV terminals to confirm the voltage and polarity are exactly what you expect. Then, you're ready for the main switch.
Commissioning Your System and Troubleshooting Tips
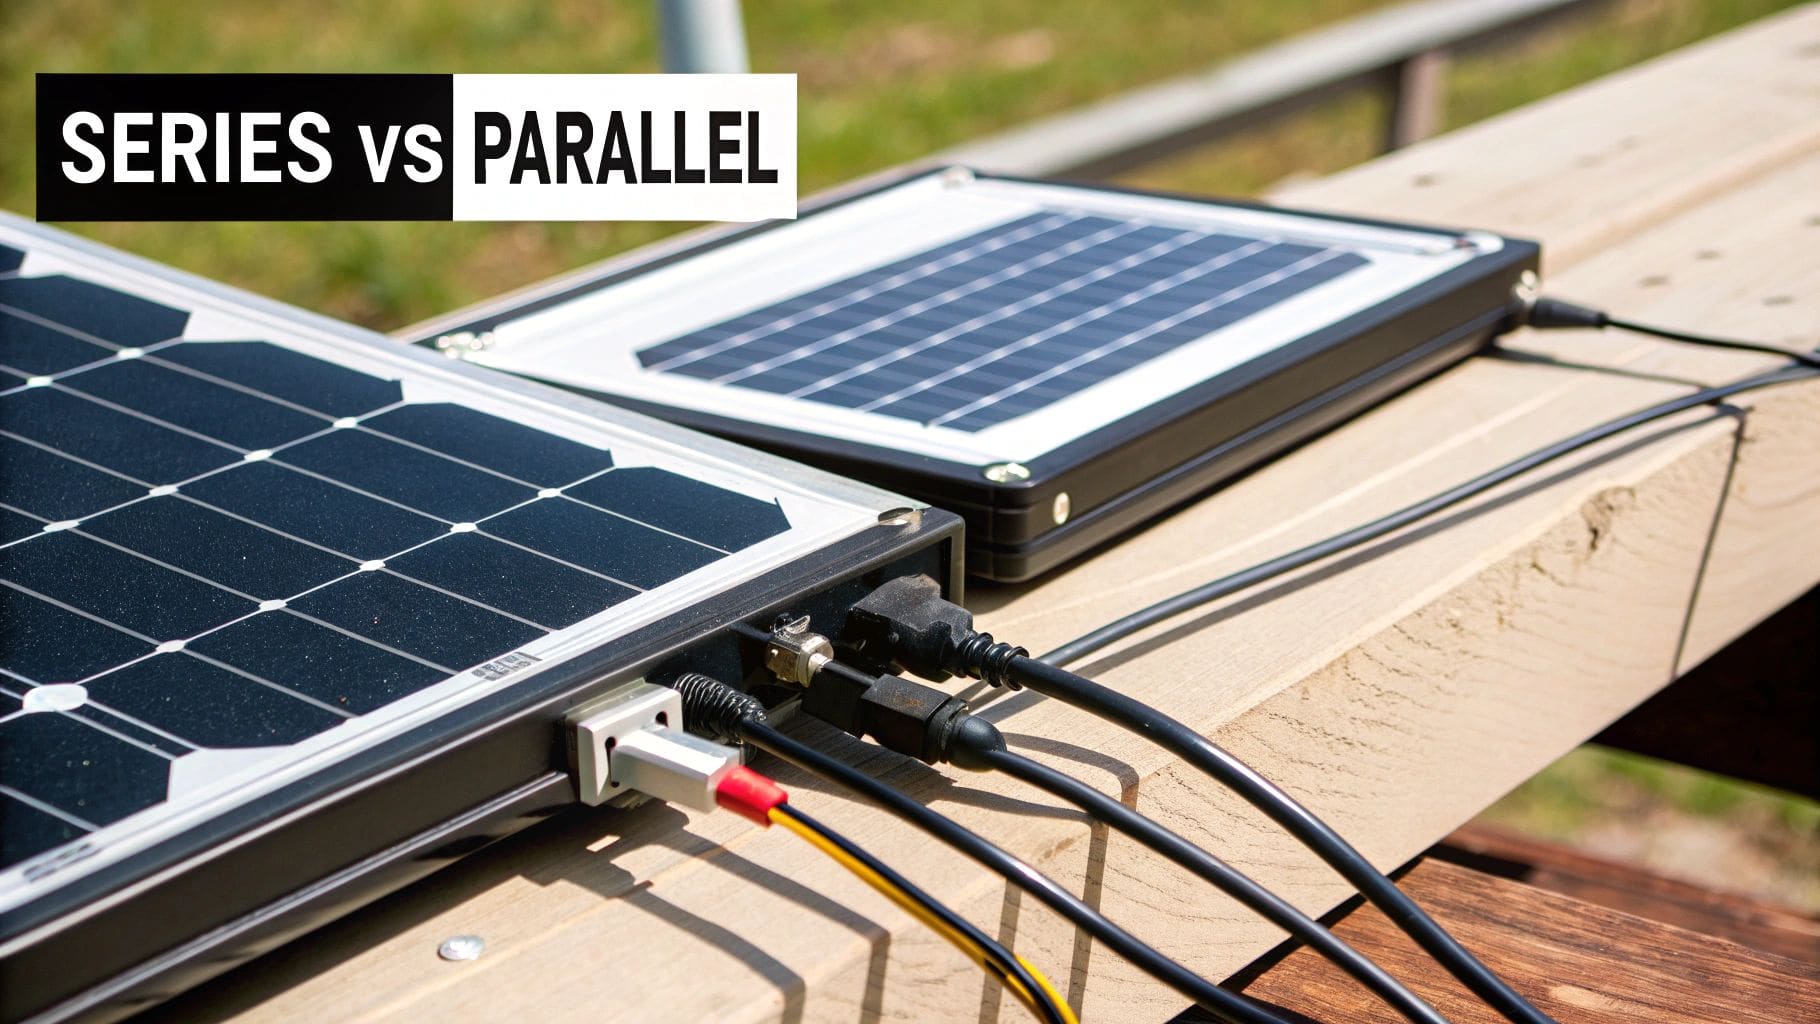
Understanding series vs parallel connections is essential for proper solar panel wiring and system performance
Alright, this is the moment of truth. The panels are wired, your components are all connected, and you're ready to flip the switch. But hold on a second. Before you do, running through a methodical commissioning process is your last line of defense against a very expensive, system-frying mistake. This isn't just a suggestion; it's a best practice that separates a reliable, long-lasting system from a ticking time bomb.
Think of this as your pre-flight checklist. The most important tool you'll use here is your multimeter. With every breaker still in the OFF position, start at your combiner box. You'll want to measure the open-circuit voltage (Voc) for each individual string. The readings you get should line up almost exactly with your design calculations. For instance, if a string of four 20V panels reads 80V, you know you're on the right track.
This is also where you confirm your polarity is correct. If your multimeter spits out a negative voltage reading, it means your positive and negative leads are swapped somewhere along the line. Catching that now will save you from potentially destroying your charge controller later.
Your Final Pre-Power Checklist
Before you even think about energizing the system, take a few minutes to run through these final checks. Spending an extra 15 minutes here can genuinely save you hours of frustration and hundreds of dollars down the road.
- Torque Check: Go back and double-check every single electrical lug and terminal screw, from the combiner box all the way to the inverter. Make sure each one is torqued down to the manufacturer's exact specifications. A loose connection is just a future failure waiting to happen.
- Ground Fault Check: Set your multimeter to the continuity setting (the one that beeps). Test between the positive lead and your equipment ground, and then test between the negative lead and the ground. You should hear no beep in either test. A beep means one of your conductors is shorted to the frame.
- Visual Inspection: Give everything one last look. Search for any pinched wires, conduit that isn't properly secured, or connections that aren't sealed against the weather. Make sure your cable management is tidy and that no wires are resting directly on the hot roof surface.
Never underestimate the importance of this final check. I once troubleshooted a brand-new system where the inverter wouldn't turn on. After an hour of digging, I found the installer had simply forgotten to torque down the main battery terminals. It's almost always the simple stuff that causes the biggest headaches.
Common Wiring Problems and How to Fix Them
So, what do you do when your multimeter gives you a reading that doesn't make sense? First, don't panic. A logical, step-by-step diagnostic process will almost always lead you right to the source of the problem.
Scenario 1: The Voltage is Zero
If you're getting a reading of 0V from a string that should be live, it means you have an open circuit somewhere.
- The most common culprit is an MC4 connector that wasn't fully pushed in until it clicked. Start by checking every connection between the panels in that string.
- Next, carefully inspect your home run cables for any signs of nicks, cuts, or other damage.
- It's rare, but you should also confirm the breaker for that string in the combiner box isn't faulty.
Scenario 2: The Voltage is Too Low
Let's say you expect 80V from a four-panel series string, but your meter is only showing 60V. This is a classic sign that one panel in the string is either being bypassed or is completely disconnected. You'll need to meticulously check each connection on that specific panel.
In another common scenario, if the voltage is roughly half of what you expect, a poorly executed MC4 crimp could be the problem. A bad crimp creates high resistance, leading to a significant voltage drop.
Fixing these errors is non-negotiable. Even a small wiring mistake can cause a major drop in your system's output over time. This is especially true on a larger scale, where seemingly minor errors can reduce overall system efficiency by several percentage points, which translates into a real loss of energy and money. As solar installations vary so much worldwide, sticking to standard practices is crucial for maximizing your investment. For more on market trends, the SEIA website offers some great insights.
Ultimately, a deep understanding of these troubleshooting steps is what builds confidence and ensures you get every last watt out of your hard work. Knowing how to diagnose and fix these common issues is the key to maximizing your system's output. To learn more, check out our comprehensive solar panel efficiency guide.
Frequently Asked Questions About Solar Wiring
Even with the best guide in hand, a few questions always pop up when you're in the middle of a solar panel wiring project. It's completely normal. Let's walk through some of the most common ones I hear from folks tackling this for the first time, so you can get back to your project with confidence.
What Gauge Wire Should I Use For My Solar Panels?
This is a big one, and the answer is: it depends. The right wire gauge (its thickness) comes down to your system's voltage, amperage, and the distance the wire has to travel. If you pick a wire that's too thin for the current it needs to carry, you'll get a significant voltage drop. That's not just wasted power—it's a genuine fire hazard.
For instance, a system wired in parallel often has high amperage, which demands a much thicker (and pricier) wire. A high-voltage series system, on the other hand, can get away with a thinner wire for the same amount of power. The best way to nail this is to use an online voltage drop calculator. Your goal is to keep the power loss to 3% or less. Don't guess on this one.
Do I Really Need a Combiner Box?
For a simple setup with just one or two strings of panels, you might be able to get by without a combiner box. In that case, you could technically wire the panels directly to a fused disconnect switch before they hit the charge controller.
However, once you have three or more strings, a combiner box becomes a non-negotiable part of the setup. It's more than just a junction box; it's a critical safety component. It gives you a clean, central spot to join your parallel strings and, crucially, holds the fuses or breakers for each one. This protects your expensive gear and makes finding a problem down the road a whole lot easier.
I've seen people try to skip individual string fusing, and it's a huge mistake. If one panel shorts, it can suddenly pull a massive amount of current from all the other healthy strings wired in parallel. That's a recipe for disaster. The combiner box is what prevents this from happening.
Can I Mix Different Solar Panel Models?
I get asked this a lot, and the short answer is you really shouldn't. Mixing and matching panels is a bad practice, especially if they're in the same series string.
If you wire panels with different voltage ratings in series, the entire string's output gets dragged down by the lowest-performing panel. It's the classic "weakest link" scenario. The same thing happens with amperage if you connect mismatched panels in parallel. If you're absolutely forced to mix panels, they must have nearly identical electrical specs (Vmp, Imp, Voc, Isc). Even then, you should only combine identical strings in parallel. For the best, most predictable results, always use matching panels.
At SolarPowerGenius, our mission is to provide clear, straightforward information you can actually use for your solar project. From in-depth guides like this to hands-on product reviews, we're here to help you make the right calls. Explore our resources and build your system the right way.