A Real-World Guide to Self Install Solar Panels
Thinking about self install solar panels? This guide provides a real-world look at everything from system design to final inspection for your DIY solar project.
A Real-World Guide to Self Install Solar Panels
Thinking about installing your own solar panels? It's a fantastic way to slash your energy bills and gain some real independence from the grid. You'll save a ton on labor costs, that's for sure, but don't underestimate the challenge. This is a serious project that demands real construction and electrical skills.
Before you even think about ordering a kit, you need to be brutally honest with yourself about your abilities, the time you can commit, and what your local rules demand.
Should You Actually Install Your Own Solar Panels?
The allure of a DIY solar project is powerful. Who wouldn't want to save thousands of dollars and get the immense satisfaction of a major home upgrade? But let's be clear: this isn't a weekend project for the average handyman. It's a serious commitment that requires a mix of specific skills, a lot of patience, and an unwavering focus on safety.
This is about more than just being good with a power drill. To do this right, you need a very particular set of skills. Are you truly comfortable working on a steep roof for hours on end? Do you have a solid grasp of electrical wiring, know how to read a single-line diagram, and understand the safety precautions involved? These aren't nice-to-haves; they're absolute musts.
Weighing the Real Costs and Benefits
Let's talk money, because that's the number one reason people consider going the DIY route. By cutting out the professional labor, you can dramatically lower the overall price tag. But you have to balance that initial savings against some very real risks and potential hidden costs.
-
Financial Upside: You're building sweat equity and dodging the single biggest expense of a pro installation: labor. This can make the whole idea of going solar a lot more affordable.
-
Knowledge and Control: You'll know your system inside and out. That's incredibly empowering when it comes to troubleshooting or performing maintenance down the road.
-
Potential Downsides: You're on your own. That means figuring out the maze of local permits, and you won't have a professional warranty to fall back on if the installation goes wrong. A simple mistake could lead to expensive roof leaks or, worse, a serious electrical fire.
Ultimately, the decision to self-install solar panels comes down to a big trade-off. You're swapping the peace of mind and convenience of a professional install for major cost savings and a true connection to your home's power.
The Growing Trend of DIY Solar
The good news is that the market is making this easier than ever before. The U.S. solar market has exploded, hitting a total installed capacity of about 239 GW by the end of 2024. That year alone, the country added around 50 GW of new solar capacity.
This growth, fueled by policies making solar more affordable, has led to a flood of better, more homeowner-friendly DIY solar kits.
Of course, the bigger question of whether solar makes sense for you is a personal one. We've put together a detailed guide exploring if solar is worth it for the average homeowner. It's worth a read before you fully commit to taking this project on yourself.
Getting Your Solar Design and Permits in Order
Believe it or not, the most important part of any self-install solar panels project happens on the ground, long before you ever climb a ladder. This is the planning stage, where you map out every single detail. Getting this part right isn't just a good idea—it's absolutely essential for a system that's safe, efficient, and, most importantly, legal.
Your first stop is your local building department. Every city, county, and utility has its own rulebook, overseen by what's called the Authority Having Jurisdiction (AHJ). This could be your city's planning office or even your homeowner's association. You need to get a crystal-clear understanding of their specific requirements before you even think about buying equipment.
This homeowner is taking pride in their self-installed solar power system, a testament to careful planning and execution.
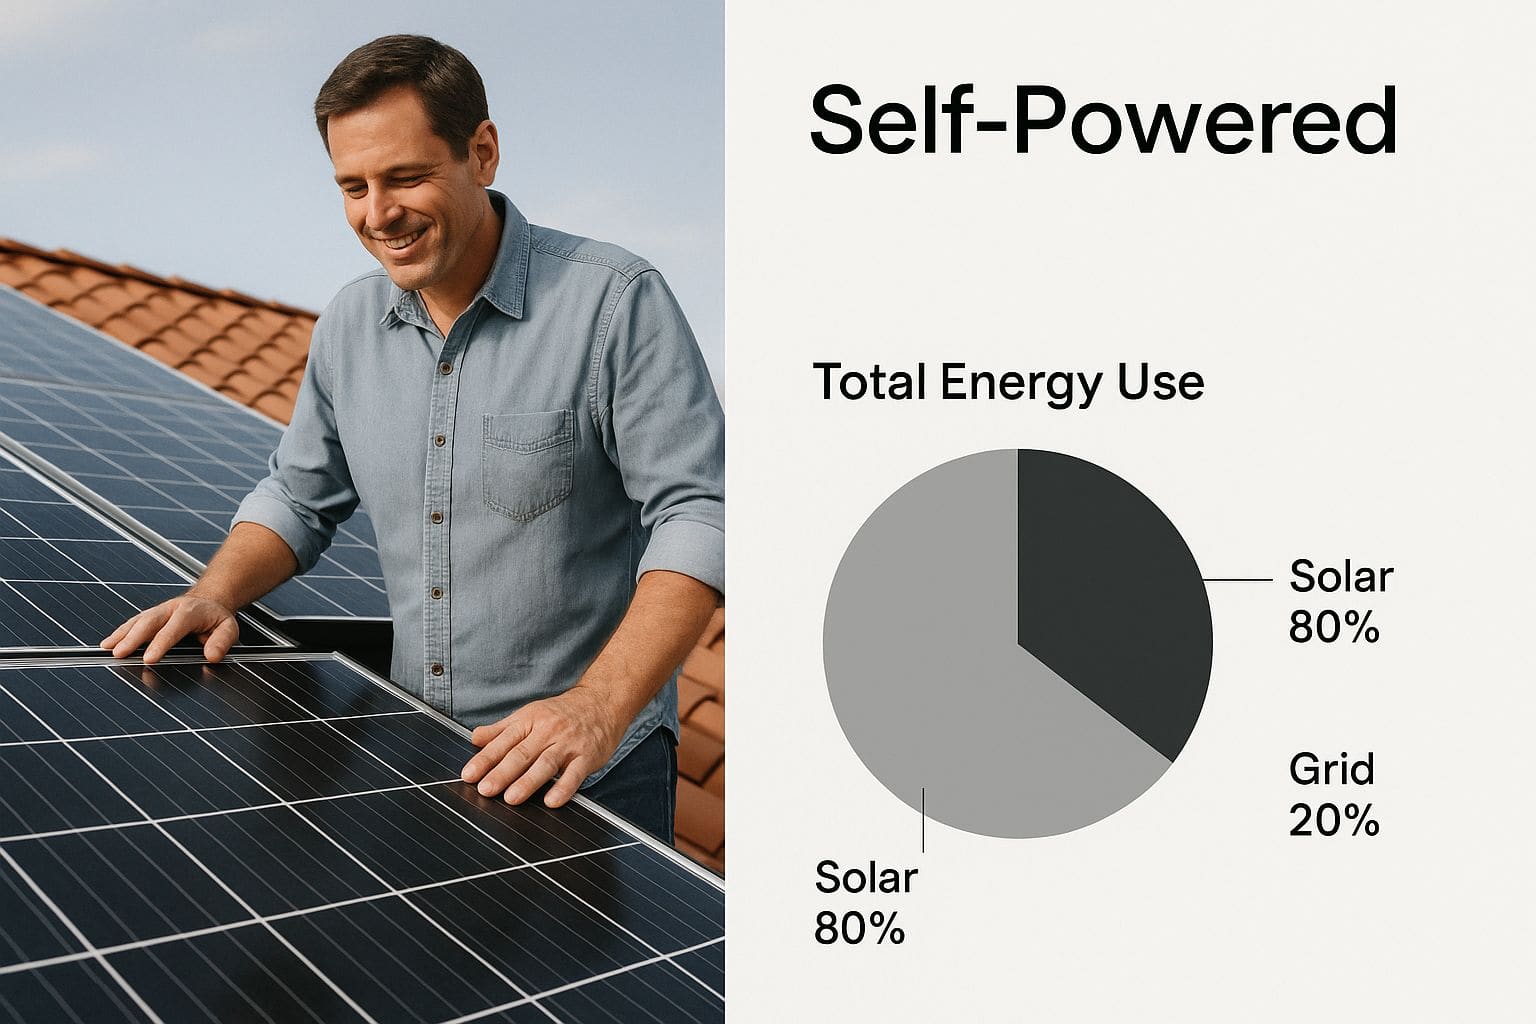
Achieving a 'Self-Powered' status is the ultimate goal, turning your home into its own miniature power plant through meticulous DIY effort.
Giving Your Site a Hard Look
Once you know the rules, it's time to evaluate your property. This goes way beyond just finding a sunny spot. You're doing a full-blown analysis to see if your home is truly ready for solar.
-
Roof Health and Structure: Think about this: your solar panels are going to be up there for 25+ years. Is your roof new enough to last that long? You'll also need to locate the roof rafters and be certain they can support the added weight, which usually comes in around 2-4 pounds per square foot. If you have any doubt, hiring a structural engineer for a few hundred dollars is one of the smartest investments you can make.
-
Sun Exposure and Shading: You're looking for a wide-open view of the sun, ideally on a roof that faces south. Grab a sun path tracking app on your phone and walk the property. Map out any potential shade from trees, chimneys, or that new two-story house your neighbor just built. Even a little bit of shade on a single panel can tank the performance of your entire system.
Nailing Down the Right System Size
Figuring out how many panels you need is a bit of a balancing act. You want enough power to cover your usage, but you don't want to overbuild and waste money on a system that's too big.
The best place to start is with your old power bills. Pull out your statements from the last 12 months and find your total kilowatt-hour (kWh) consumption for the year. Divide that number by 365 to find your average daily energy use. For instance, if you used 10,950 kWh last year, your daily average is 30 kWh. That's the magic number your new system should aim to produce each day.
Key Takeaway: Your single-line diagram (SLD) is the single most important document you will create. It's the electrical roadmap of your entire system, from the panels down to the grid connection. The AHJ requires it with your permit application to prove you've designed a system that's safe and up to code.
Now, let's talk about the cost. Going the DIY route can save you a significant chunk of change, but it's important to know where that money is going.
DIY Solar Cost Breakdown Vs Professional Install
This table gives you a ballpark idea of the costs for a typical 6kW residential system, comparing a DIY approach to a professional installation. As you can see, the biggest savings come from eliminating labor costs.
| Cost Component | DIY Self-Install Estimate | Professional Installation Estimate |
|---|---|---|
| Solar Panels (6kW) | $3,000 - $4,500 | $4,500 - $6,000 |
| Inverter | $1,200 - $2,000 | $1,500 - $2,500 |
| Racking & Mounting | $800 - $1,500 | $1,200 - $2,000 |
| Wiring & Electrical | $500 - $1,000 | $1,000 - $1,800 |
| Permitting & Fees | $300 - $700 | $500 - $1,000 |
| Labor & Overhead | $0 | $5,000 - $8,000 |
| Total Estimated Cost | $5,800 - $9,700 | $13,700 - $21,300 |
By taking on the project yourself, you could potentially cut the total cost by more than half. That's a powerful incentive, but it comes with the responsibility of getting every detail right.
Navigating the Paperwork Labyrinth
The permitting process can feel like a bureaucratic nightmare, but it's there for a reason: safety. It's a final check to make sure your project is sound. Your application package will almost always need these three things:
- A Detailed Site Plan: This is an overhead drawing of your property showing where the array will sit on the roof and where key components like the inverter and disconnects will be mounted.
- The Single-Line Diagram (SLD): As mentioned, this is your electrical blueprint. It has to show every component, wire size, breaker rating, and safety device.
- Equipment Spec Sheets: You'll need to print out and include the official manufacturer datasheets for your solar panels, inverter, and racking system.
It's also worth noting that the wider solar market can affect DIYers. In the United States, residential solar installations saw a dip in Q1 2025, with 1,106 MWdc added—the lowest since Q3 2021. Economic headwinds and changing state-level incentives played a big role. You can dive deeper into these solar market trends in the latest SEIA report.
Choosing the Right Solar Equipment
A DIY solar project is only as good as its weakest link. Picking the right hardware is a massive step that will define your system's efficiency, how reliable it is, and how long it lasts. This isn't just about grabbing the most powerful components off the shelf; it's about finding compatible gear that plays well together and is built to handle your local climate.
I know this part can feel like a lot, but if you break it down into the three main parts—panels, inverters, and the mounting hardware—it becomes much easier to tackle. Each piece of this puzzle has a major impact on both the final cost and how well your system actually performs day-to-day.
Selecting Your Solar Panels
The panels are what everyone sees, and for a home installation, you're generally looking at two main types of silicon panels.
- Monocrystalline Panels: These are the sleek, black panels made from a single, pure silicon crystal. They're the top performers, with efficiency ratings typically hitting 17-22%. That means you can squeeze more power out of a smaller footprint, which is a huge plus if you have limited roof space. The trade-off? They do cost a bit more.
- Polycrystalline Panels: You can spot these by their distinctive blue, marbled look, which comes from melting multiple silicon fragments together. They're a little less efficient (usually around 15-17%) and need more room to generate the same power as monocrystalline panels. Their big advantage is the lower price tag, making them a solid, budget-friendly choice if you've got plenty of sunny roof to work with.
For most people I talk to, it boils down to balancing the budget against the real estate on their roof. Once you've settled on a panel type, the next question is how many you'll need. To get that number right, we've put together a detailed guide on how many solar panels you need for your home.
Choosing the Brains of the Operation: The Inverter
If the panels are the muscle, the inverter is the brain. This is probably the most complex piece of electronics in the whole setup. Its job is to take the Direct Current (DC) power your panels create and convert it into the Alternating Current (AC) your home's appliances can actually use. You've got three main options here.
String Inverters This is the classic, tried-and-true option and usually the most affordable. All your panels are wired together in a "string," which runs down to a single inverter box on the side of your house. The big catch is that if one panel's output drops because a tree casts a shadow over it, the performance of the entire string goes down with it. Think of it like an old string of Christmas lights—when one bulb goes out, the whole thing can go dark.
Microinverters This approach puts a small, dedicated inverter on the back of every single panel, converting DC to AC right at the source. It's a more expensive setup, but the performance is fantastic, especially if your roof has some tricky shading or has sections that face different directions. Since every panel works independently, a single underperforming panel won't drag the others down.
Power Optimizers This is the hybrid option, giving you a bit of the best of both worlds. Like microinverters, a small optimizer is attached to each panel. But instead of converting the power, it just "conditions" the DC electricity before sending it down to a central string inverter. This gives you the panel-level monitoring and shade mitigation of microinverters but at a price point that's closer to a traditional string system.
Racking and Mounting: The Unsung Hero
Your racking is the skeleton holding everything together. Trust me, this is not the place to cut corners. The hardware you choose has to be specifically rated to handle the highest wind and snow loads for your area. You can get these numbers from your local building department.
A robust racking system is non-negotiable. It must be properly flashed and sealed at every roof penetration to prevent leaks and engineered to withstand local weather conditions for the next 25 years.
The good news for DIYers is that the massive global push for solar has made high-quality components more accessible and affordable than ever. In 2024 alone, an incredible 600 GW of new solar capacity was installed worldwide, bringing the total to over 2.2 terawatts. This boom, led by markets like China, means more options and better prices for people installing their own systems.
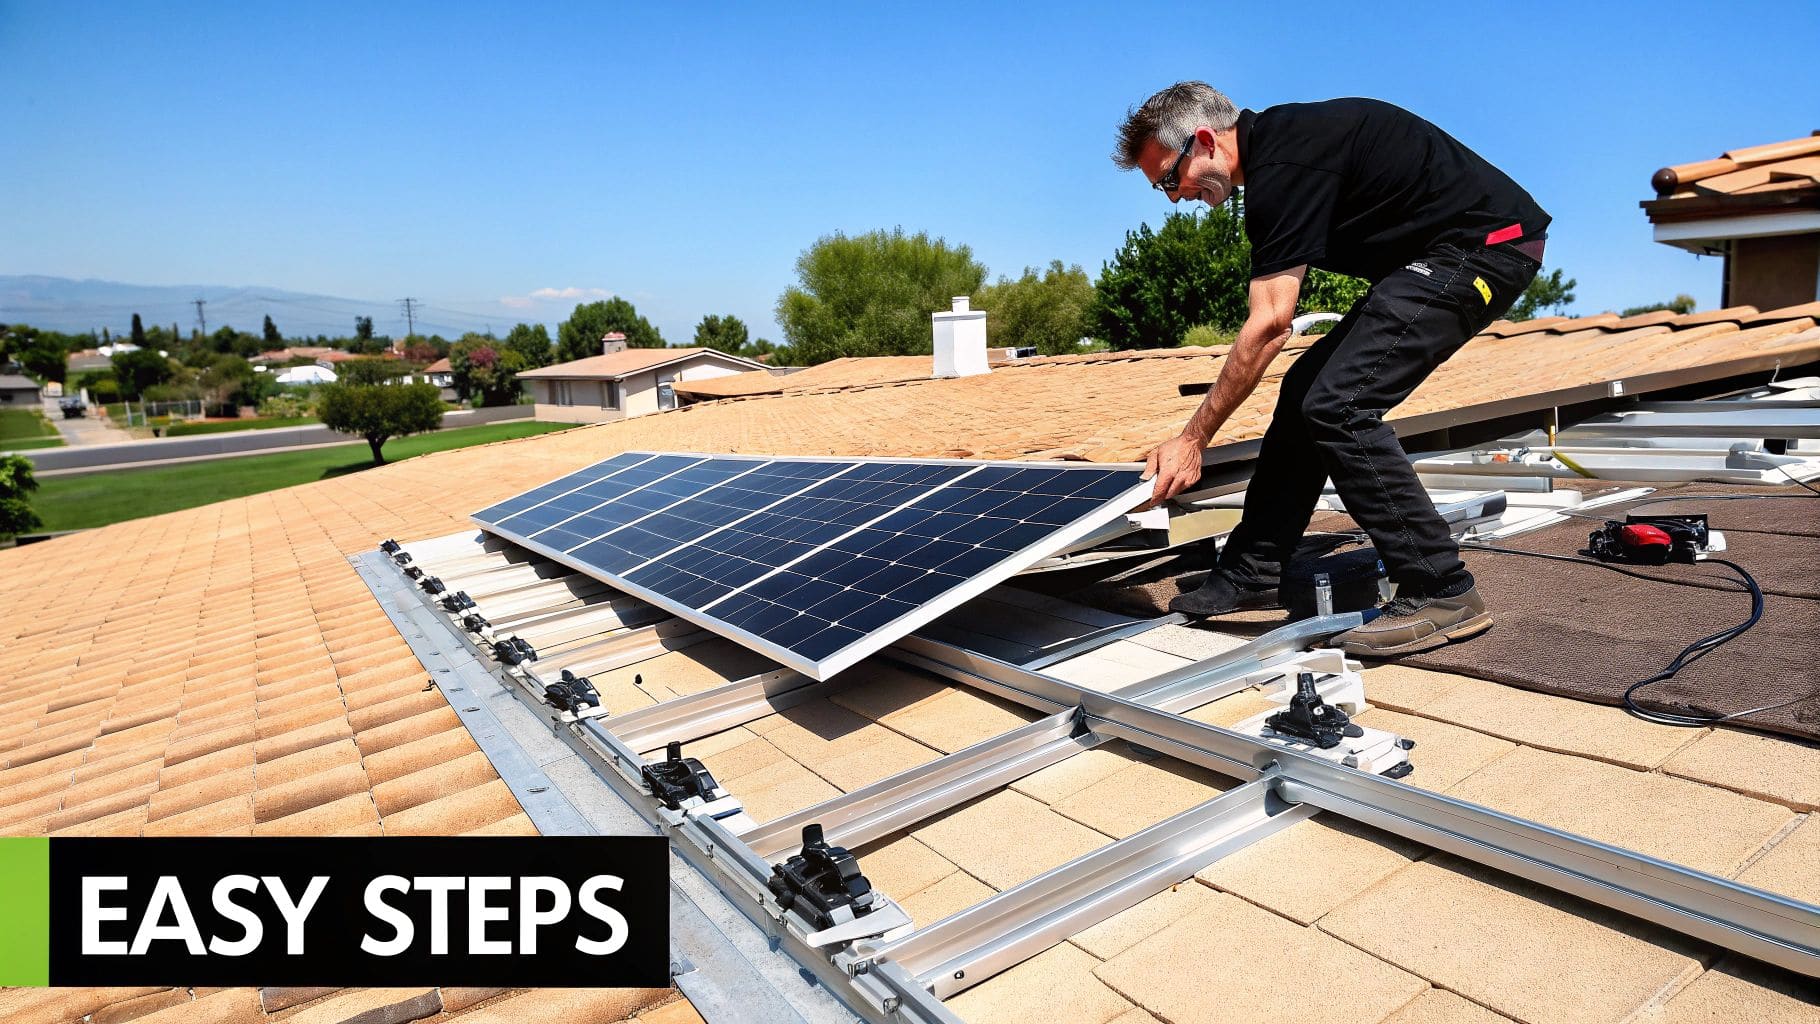
Time to Get Your Hands Dirty: The Mechanical Installation
Alright, the plans are approved, and a small mountain of boxes is sitting in your driveway. Now for the exciting part—turning those plans and all that gear into a power-generating reality on your roof. This is where precision, patience, and a serious respect for safety come together. Get this part right, and you'll have a secure, leak-proof system that will crank out clean energy for decades.
Before you even think about grabbing a drill, let's talk safety. Seriously. Working on a roof is no joke, and this isn't the place to cut corners. That means using proper fall protection—a harness tied off to a secure anchor point—every single time. Make sure your ladder is on solid, level ground and properly secured before you take that first step up.
Prepping the Roof and Laying Out Your Racking
The racking system is the literal foundation of your solar array. It needs to be anchored directly into the rafters—the structural bones of your roof. Your first mission is to find and mark the exact center of every rafter where a mount will be placed. A good stud finder is invaluable here, but I've also had luck just tapping gently across the roof, listening for the solid thud of a rafter versus the hollow echo of the space between.
Once you've found them, pop some chalk lines across your marks. This ensures all your mounting feet will line up perfectly straight. It might seem like a small detail, but it's what makes the difference between a professional-looking job and a sloppy one. Trust me, it also makes installing the rails a thousand times easier.
Drilling into your roof feels like a point of no return, and in a way, it is. Be precise. Each pilot hole needs to be dead center on the rafter. Then, before you drive in a single lag bolt, squirt a generous amount of high-quality, weatherproof sealant into the hole. This is your first line of defense against leaks.
A single leaky roof penetration can cause thousands of dollars in water damage. Do not skip this. Every hole must be flashed and sealed exactly as the manufacturer tells you to. No exceptions.
With the hole sealed, you'll install the flashing. This metal plate slides up and under the shingle row above the mount, creating a pathway for water to flow right over and around the penetration point. It's this one-two punch of sealant and flashing that will keep your roof watertight for the life of the system.
Mounting the Rails and Setting the Panels
Now that your mounts are securely in place, it's time to attach the aluminum rails. These are the long tracks your panels will sit on. They're not terribly heavy, but they are long and awkward, so this is definitely a two-person job.
Attach the rails to the mounts, but don't tighten the bolts all the way just yet. Grab a level and make sure the rails are perfectly straight, shimming or adjusting as needed. Once you're satisfied, you can crank everything down. This is also when you'll install any grounding hardware that bonds all the metal rails into one continuous, safe electrical system.
Here comes the moment you've been waiting for: putting the panels on the roof. They are surprisingly heavy and cumbersome, so plan your lift and have a helper.
- Handle with care. Never, ever step on a panel or put your weight on it. Always carry them by the sturdy aluminum frames.
- Position and clamp. Carefully set each panel onto the rails. You'll use specialized mid-clamps between panels and end-clamps for the ends of each row.
- Torque it right. This is critical. Use a torque wrench to tighten every single bolt to the manufacturer's exact spec. Too tight, and you can damage the panel frame; too loose, and you might see a panel flying off in a windstorm. Don't guess.
As you go, make sure you're managing your wires properly. Use the clips that came with your racking to tuck the panel wires securely to the panel frames. You want to keep them up off the hot roof surface, which can degrade the insulation over time. When it comes to a self install solar panels project, clean wire management is a hallmark of a pro job. It looks better and, more importantly, protects the wiring, ensuring the safety and longevity of your entire system.
Navigating the Electrical Wiring
Alright, with the panels mounted, we're heading into the most critical part of any self install solar panels project: the electrical work. This is where you absolutely cannot afford to cut corners. Precision here isn't just about making things work; it's about keeping your home and family safe. The wiring is what transforms that static array on your roof into a power-generating workhorse, but it also presents the biggest risk if you get it wrong.
Before you even think about touching a wire, your first job is to kill the power. I don't just mean flipping the main breaker off. You need to perform a proper lock-out/tag-out at your main service panel. This means shutting off the main breaker and then physically locking it so no one can accidentally flip it back on while you're working.
Running and Protecting Your Wires
The wiring starts up on the roof where you'll be connecting the DC power from the panels. If your system uses microinverters, you'll be linking each unit's AC trunk cable. If you went with a string inverter, you'll run DC wiring from the panel strings down to a combiner box.
No matter which setup you have, every single wire running on the outside of your house needs to be protected inside a conduit. This is usually a rigid metal or PVC conduit that's specifically rated for outdoor use and can stand up to UV rays. This simple tube is what will shield your wiring from physical damage, rain, snow, and the sun for decades to come.
Take your time planning the conduit route. The goal is always the straightest and shortest path from your roof array down to where your inverter will live. Keep in mind that every bend you make has to follow the National Electrical Code (NEC). They have specific rules about how many bends you can have in one run of conduit to avoid stripping or damaging the wires as you pull them through.
Safety is Absolute: Always—and I mean always—use a multimeter to double-check that a circuit is dead before you start working on it. Test the voltage between the hot and neutral wires, hot and ground, and neutral and ground. Never just trust a breaker. Your meter confirming zero voltage is the only thing you should trust.
Connecting the Major Components
With your conduit securely in place, you can start wiring up the main equipment. Think of it as a step-by-step process where each connection brings your system one step closer to making power.
-
AC Disconnect Switch: The NEC mandates a lockable AC disconnect switch between your inverter and the main panel. This is a non-negotiable safety device. It gives utility workers or firefighters a quick, obvious way to kill the power coming from your solar system without having to enter your home.
-
Inverter Installation: Find a good spot for your inverter—somewhere cool, dry, and with plenty of space around it for air to circulate, just like the manufacturer's instructions specify. You'll run the DC wires from the roof into the DC side of the inverter, and then run the AC wires from the inverter's output over to that new AC disconnect switch.
-
Grounding Everything: Proper grounding isn't optional; it's essential for safety. Every single metal part of your installation needs to be connected to your home's main grounding system. This includes the panel frames, the metal racking, the inverter's body, and the conduit itself. This creates a safe path for electricity to go in case of a fault, preventing a serious shock hazard.
For a deeper dive into the nitty-gritty of the wiring process, check out our detailed guide on how to properly wire solar panels. It's a great resource to have open during this phase.
Tying Into Your Home's Service Panel
This is the grand finale of the electrical work—connecting your solar system directly to your home's grid. It involves adding a new, dedicated circuit breaker into your main electrical panel and hooking up the AC output from your system to it.
The size of this breaker depends on your inverter's maximum output and some specific NEC rules. One of the most important is the 120% rule, which basically says the power coming from your solar (the backfeed breaker) plus your main breaker can't add up to more than 120% of what your panel's busbar is rated for. If you can't meet this rule, you might need a different kind of connection called a line-side tap, or even a full panel upgrade.
Honestly, this is the point where many smart DIYers decide to call in a pro. A licensed electrician can handle this final tie-in for a few hundred dollars. They'll do it safely, make sure it's up to code, and give you priceless peace of mind. It's a small cost for ensuring the heart of your electrical system is done perfectly.
You've done all the hard work, and the finish line for your DIY solar project is finally in sight. But before you can start producing your own clean energy, a local inspector needs to give your system the official seal of approval. This isn't just a formality; it's a critical safety check to ensure everything is up to code.
Don't underestimate this step. Inspectors are paid to be thorough. They'll look at everything from the tiny torque marks on your racking bolts to the specific warning labels on your conduit and disconnect switches. A neat, professional-looking job can make a surprisingly big difference in how smoothly this goes.
Run Through Your Own Pre-Inspection Checklist
Before you even think about calling the inspector, do a full walkthrough yourself. Trust me, spending an hour on this now can save you the headache of a failed inspection and having to reschedule.
- Labels, Labels, Labels: Walk the entire system with your approved plans in hand. Is every single label in place? Check the AC disconnect, the breakers, the inverter—everything needs to be clearly and correctly marked.
- Torque & Tightness: Grab your torque wrench again. Double-check that all your critical connections, both mechanical and electrical, are tightened to the exact specs listed by the manufacturer. Leaving a visible paint-pen mark on the bolts is a pro tip that inspectors love to see.
- Solid Grounding: Verify that every major component—the panels, the racking, and the inverter—is properly bonded together and connected to your home's main grounding system. This is a huge safety point.
Once the inspector gives you the green light, you get the satisfaction of powering on the system. Be sure to follow the start-up sequence in your inverter's manual to the letter.
Crucial Final Step: You absolutely cannot turn on your system and send power to the grid until you have official Permission to Operate (PTO) from your utility company. Operating without it can lead to serious problems and penalties.
After you have that PTO letter in hand, it's the moment of truth. Flip the switches, get your monitoring software connected, and watch the kilowatts start rolling in from your very own rooftop power plant.
Got Questions About Your DIY Solar Project? Let's Clear Things Up.
Even the best-laid plans hit a snag or two. When you're putting solar panels on your own roof, questions are just part of the process. Let's walk through some of the most common hurdles I see DIYers run into, so you can keep your project on track.
A big one I hear all the time is about mixing and matching components. It's really tempting to bargain-hunt for panels from one place and an inverter from another, but I generally advise against it. Sticking to a pre-designed kit or components you know are compatible is the safer bet. This guarantees your inverter, panels, and racking all play nicely together, which is non-negotiable for system performance and safety.
Am I Qualified to Handle the Electrical Work?
This is probably the single most important question you need to answer honestly. In many places, homeowners are legally allowed to do their own electrical work, but that doesn't mean everyone should. You need a solid grasp of the National Electrical Code (NEC) and must be completely comfortable handling high-voltage DC and AC electricity.
A hybrid approach is often the smartest move for most people. Go ahead and do all the mechanical work yourself—mounting the rails, attaching the panels, running the conduit. Then, bring in a licensed electrician for a few hours to handle the final connections to your main service panel. You still save a huge amount of money, but you get the peace of mind knowing the most dangerous part of the job was done by a pro.
One thing that trips people up is series vs. parallel wiring for the panels. Here's the deal: wiring in series adds up the voltage but keeps the amperage the same. Wiring in parallel adds up the amperage while the voltage stays put. Your inverter has a very specific "sweet spot" for input voltage and amps, and you absolutely must design your wiring to stay within that range.
What if Something Breaks Down the Road?
When you go the DIY route, you're the one on the hook for service calls—there's no installer warranty to fall back on. The good news? Reputable solar equipment is built to last and comes with excellent manufacturer warranties. You're typically looking at 25 years for panels and a solid 10-12 years for most inverters.
If a part does fail, the process falls to you. You'll need to troubleshoot the problem, contact the manufacturer to file a claim, and then physically swap out the faulty component. This is where all that hands-on knowledge you gained during the installation really pays off.
At SolarPowerGenius, our goal is to give you the clear, expert-backed information you need for a successful project. Check out our detailed guides and reviews to help bring your solar ambitions to life at https://solarpowergenius.com.